Yann’s Life Status :
Yann is an adult suffering from a pathology of the nerves (an NMMBC [1] for topic’s specialist) which in particular renders ineffective the control of a muscle of his left thumb, the one which brings the thumb into the position of opposition towards the other fingers (aptly named “opposing thumb muscle”, see image below). The muscle atrophies. Yann can therefore no longer have a normal grip with his left hand, which is inconvenient for a cook (to hold a bread, a sausage, an onion … while his right hand cuts slices for example).

[image en provenance du site Doctissimo]
A need for an orthosis
He would therefore need a mechanical assistance to place his thumb in opposition, but he also needs to be able to move back his thumb when needed in the plane of the palm for other manipulations (like cutting thin slices of salmon for example).

Occupational therapists in the hand surgery department at Grenoble University Hospital can build a rigid orthosis that will keep Yann’s thumb in opposition, but this will prevent him from raising it to put his hand flat back on the working table. The orthosis to be designed must also be compatible with the hygienic constraints associated with the cooking profession, and to be as compact or invasive as possible to minimize the inconvenience of wearing over a long period. So his occupational therapist advised him to contact our team (“makers” of e-Nable France) to envision if 3D printing technology could produce an adapted orthosis to his situation.
Methodology
The project was first entrusted to a group of engineering students from Grenoble-INP Génie Industriel [2]. After a very detailed study of the needs, and the usage of a 3D scanner to model Yann’s hand, they carried out a benchmark which confirmed that most of the existing orthosis for hands are made from thermo plastic mesh which remains rigid after shaping. Unfortunately this would prevent Yann from bringing his thumb back into the plane of the palm. But the scanned model made it possible to print an exact copy of Yann’s hand to quickly test the placement of various orthosis prototypes. However, this does not make it possible to judge the effectiveness of maintaining the thumb in the desired position. Recurrent interviews with Yann were necessary to fully understand the solution. All this work resulted in a printed orthosis made from a flexible material (TPU) which wraps around the hand, hooks to the base of the index-middle fingers, and maintains the thumb in an opposable position, without preventing the return of the thumb to the flat hand position. The result of this study is promising, but keeping the thumb in opposition still seems insufficient to Yann, the orthosis is a little too bulky to be used over a long period by Yann as part of his job.

Design Steps
For this development we followed an iterative user-centered design process, which steps are defined below.
Step 1 :
During a meeting with Yann, the observation of the previous prototype on his hand, and gathering his feelings and expectations as the final user, we generally come out with a drawing on a paper, which provides the raw aspect of the future orthosis, highlighting the evolution compared to the previous version. See two examples of such sketches on the pictures opposite.

Step 2 :
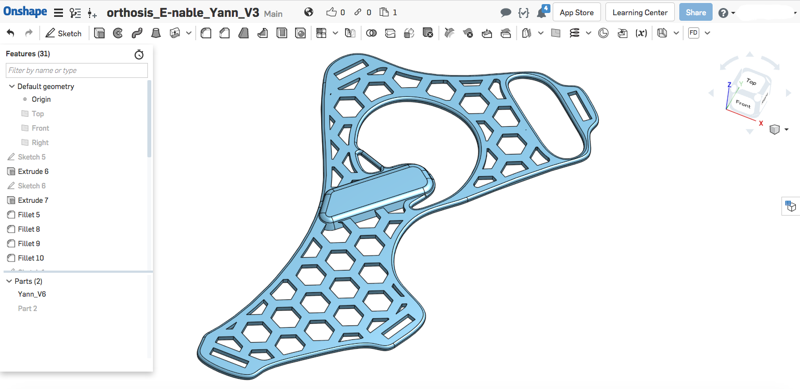
Uploading the hand drawing into the CAD system then allows sketching a digital model of the outlines of the orthosis (mainly by Spline curves).

Step 3 :
After adjustment of the sketch curved lines to achieve a ‘nice’ appearance, the base shape is obtained by extrusion with a thickness of 1.6mm to 2mm depending on the flexibility we expect.

Step 4 :
Parallel line cut allow keeping only the contour boundaries (3mm to 4mm width). The holes will later be replaced by honeycomb structure.

Step 5 :
Design of a matrix with honeycomb shape. Various parameters are adapted to properly fill the orthosis. Not too much material and not too much holes.

Step 6 :
Extrusion of the honeycomb structure, removing of the outer extrusion to keep only inner elements, and finally merging with the boundaries.

Step 7 :
Designing, extruding (thickness of 3mm to 4mm) and merging the blocking “blade” that will push on the back of the thumb.
Note also the small link added on the left side of the blade, to help pushing the thumb.

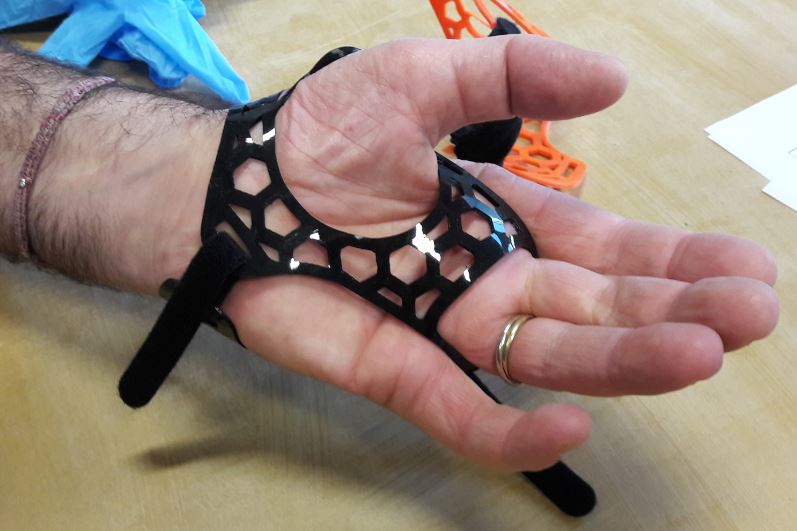
How it works
The idea is that the honeycomb orthosis fits the hand of the patient, and the thicker tongue, that is more rigid, pushes the thumb towards the opposition configuration. So wearing this device maintains the thumb in this position. But simultaneously, the whole orthosis being printed with quite flexible material, the person can overcome the small force provided by the tongue to extend his thumb and get the hand flat when needed.
The way to wear it is presented on the series of pictures below.
About the material we use
For this kind of device we use either TPE (thermoplastic elastomer) which is a “flexible filament” or TPU (Thermoplastic Polyurethane) which is a “semi-flexible” filament.
The specific behavior of these materials is characterized by its hardness, expressed on a standard “Shore” scale. Be careful there are several scales. The ‘A’ scale is used for softer materials (like rubber band), and the ‘D’ scale for much harder ones (like solid truck tires).
The TPE filaments we use here feature between around 86 Shore A.
The other type, TPU, generally features a hardness of more than 95 Shore A, and up to 98, which is really more rigid.
So depending on what behaviour you want, you can change the material, but don’t forget the other main parameter you can adapt to get a more or less flexible part is the thickness (and infill percentage) of the printed part, and the thickness has a huge influence on the part’s flexibility or stiffness.
Improvements
This first draft of project having given interesting results and allowing to consider still some improvements, team Gre-Nable ensure the follow-up, and two additional interviews with Yann made it possible to reach a usable orthosis with a slightly thicker support tab behind the thumb.
The orthosis is also smaller and therefore less invasive than the first versions, more flexible, it clings to the middle-ring fingers (which makes it possible to better pull the thumb in opposition). The Velcro straps are also reduced in width for less discomfort.
Yann seems satisfied with the help provided by this orthosis, while leaving him the freedom of bringing his hand flat when he wishes. The fact remains, however, that the crossing of the plastic filaments between the fingers is still troublesome.
Yann therefore returned visiting his occupational therapist who placed a protection consisting of a very thin adhesive tissue, which should avoid injuring the skin between his fingers.
Achievements
Note that the following images are made on the hand of one of the designers, and the orthosis does not really fit, but this is mainly for demonstration purpose.


Picture 1 :
Here is the orthosis ready to be used, with two Velcro straps.
Picture 2 :
How to put the orthosis on the middle and ring finger, then on the thumb.
Picture 3 :
How the Velcro straps are fixed on the back side of the hand.
Picture 3 :
When the Velcro straps are tied, the configuration of the thumb is naturally opposed to other fingers…
Picture 4 :
… and allowing a heavy grasp on an object.
Picture 5 :
But the flexibility of the TPE material still allows the user to extend his thumb,
Picture 6 :
… and put the hand flat on the table.
Testimonies
“Regarding the orthosis, all improvements made the orthosis efficient and more comfortable, however, it’s still not sufficient to wear it for a long time (duration greater than 1 hour). I therefore only use it on well-defined tasks that I group together as much as possible, and efficiency is there ! […]
Thank you to the whole team, thank you for your actions which allow a few happy people to retrieve a part of their autonomy. “
“The orthosis developed by the Gre-Nable team:
- it frees the mobility of the wrist compared to the first draft,
- it allows passive opposition (by the splint) and the active feedback of the thumb in the plane of the hand,
- no bulk in the palm – disinfection is possible by immersion,
- not very bulky: fits within a vinyl glove
Yann retrieves a function without it being to the detriment of another.
This is where it is powerful ! “
To access the orthosis model we developed
For all our developments, we use a professional web-application with free access for makers named : Onshape .
If you want to use it, you only have to register. It is a very powerful and rather easy to learn Parametric CAD application developed by the former designers of SolidWorks.
All the projects developed using Onshape’s free license are public, therefore accessible to everyone for reading and copying in their environment.
Orthosis seen in Onshape
After logging into Onshape, just search for the word “Orthosis” to find all versions of this orthosis (among a few others), or “orthosis_Gre-Nable_Yann_V6” for the series of latest modifications shown in the images above.
Notes :
1) Multifocal Motor Neuropathy With Conduction Blocks causing motor deficit in part of the left hand.
2) Many thanks to the entire team of engineering students for their significant contribution to this project : Valeria Baghin, Adriana Camacho, Lucas Delaire, Dorian Gomez, Orianne Kassis, Bhargav Patel
Recent Comments